Showing posts with label Sewing. Show all posts

Tuesday, February 28, 2012

Simple Tote

Recently I found myself frustrated week after week with my little guy rummaging through my diaper bag at church. He would always pull out the lotion and the hand sanitizer and want to open them and pour them out. I finally decided that the solution would be to have a separate church bag that would only have things inside of it that he could get into. So far it has helped keep him a bit quieter through Sacrament meeting. So without further ado, meet my new church bag!


Isn't it awesome! I love the fun fabric, and it was so simple to make. The ORIGINAL TUTORIAL called for much smaller measurements, which I cut out first and then quickly realized would be too small for our needs. I then re-cut the material and made a bag quite a bit bigger. Unfortunately I cannot remember the measurements that I used. I do remember that I measured my big church binder (for me) and used that as a base measurement so that it would fit comfortably inside along with all of my son's church items.

My only problem with this bag is that I want to make a million more. I keep dreaming up uses for a new bag. I think I might need one for the gym, one for teaching dance, etc, etc. Oh, and I will probably need one in a more discreet pattern so that it will go with a lot more and not be so flashy. Don't you think? And this would also make a great gift, or even a beach bag. See! Thee possibilities are endless. We'll see if I get around to making more.

Wednesday, February 1, 2012

Car Caddy

I made this cute little car caddy for my son for Christmas! He has LOVED playing with it. He especially loves to roll and unroll it and open and close it. But he also loves playing with the fun cars inside!


I followed Jill's tutorial over at Homemade by Jill. It was a fairly simple tutorial so it actually didn't take me too long. I actually made it just a couple of days before Christmas on a last minute whim. You can tell that I am definitely not very good at sewing in a circle, especially with a zig zag stitch. Oh well, practice makes perfect right? And I don't mind that it isn't perfect. I made it and he loves it and that is all that matters!


Some things I did differently:

I used white felt for the numbers, instead of acrylic paint. I didn't have paint and I didn't want to buy any or bother with all of the stenciling and painting and drying. I just used fabric glue to secure them to the fabric. If I were to use felt again I would have sewn them on before creating the pockets.

I also put white piping all the way around the edges. I like the way it looks better than just on the top and bottom edges.

I just used canvas fabric because that's what I had, but I'm sure the duck canvas that Jill used would be a bit sturdier. Canvas worked fine though.

It was a fun sewing project and I was proud of myself for giving something handmade to my little guy! I always think it is a little extra special when you make something for your children instead of just buying something. Probably just because I know that I have spent a lot more time thinking about them in the process of making a gift. (I also love purchased gifts for kids too, so there will be plenty of those in my future.)

Saturday, January 28, 2012

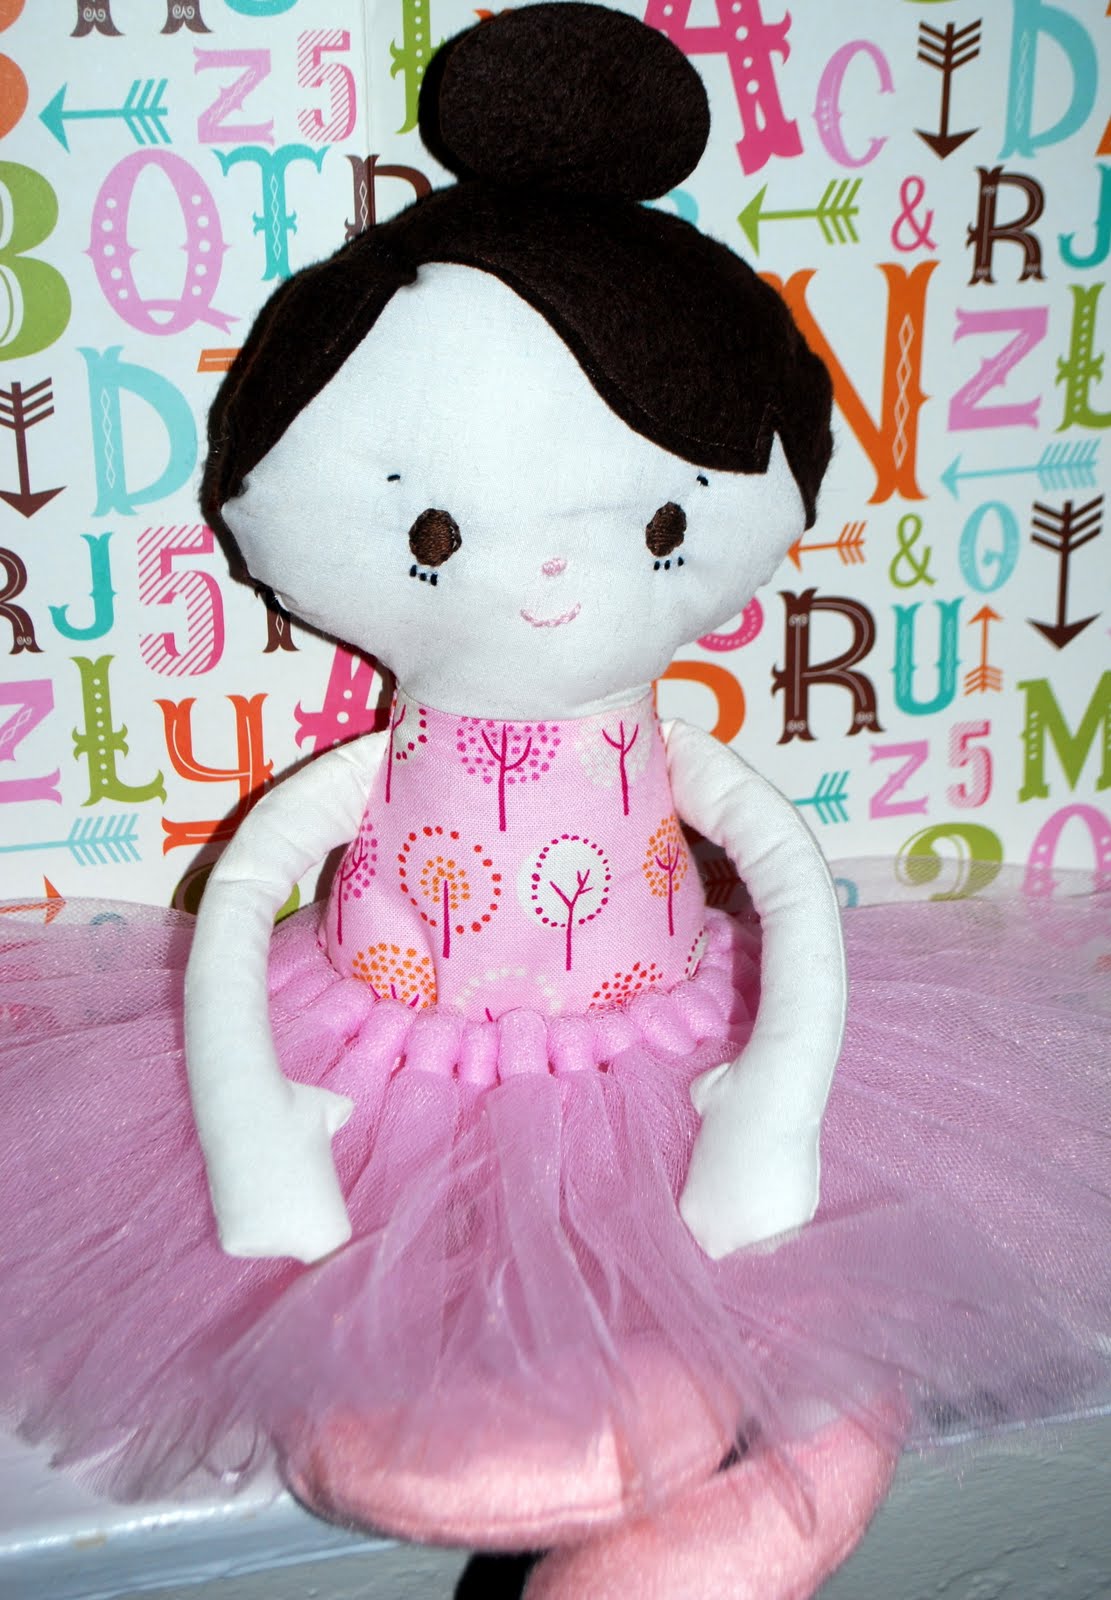
Ballerina Doll

As promised, here is more information about the doll I made for my niece's birthday gift. I used the Jo Doll pattern, from the etsy shop "Bit of Whimsy Dolls." I loved the pattern, it was great! And I am excited about making more dolls in the future for gifts, and hopefully for my own little girl someday (if we are ever blessed with a little girl).


I followed the pattern the whole way through, except that I changed the hair shape and created a bun instead. Then I add a little tulle skirt. It is actually a rather big tulle skirt for such a little doll, but I think it is super fun. It is also a removable skirt so she could always take it off if she wanted.


Another variation I made on the pattern is that I added little ballet slippers made from felt and ribbon. I just drew up a little shoe pattern, cut it out of felt, and sewed it onto the little doll legs before I did any of the sewing from the pattern. Then I tied up the ribbon the way that you tie point shoes (lucky for me I have done my fair share of dancing so I know all about point shoe tying).


One note I want to add for my own memory, and to help anyone else who might want to make a doll using this pattern, is that it would be better to trace and embroider the face before doing any of the sewing. I waited until the end like the pattern says, and it didn't turn out quite as great as it could have. The embroidery wasn't that hard, but sketching on the face was hard and I think it could have turned out better if I had done it before. At the very least, you should trace the face onto the fabric before sewing so that you know where to embroider later on. Hopefully those notes help someone else who might use the pattern.

Another thing, sewing up the bottom of the doll was SUPER hard for me. It definitely did not turn out very good, which is unfortunate because it is sewn on the outside so you can see my horrible stitching. I am grateful for the tulle skirt that covers my poor sewing. Hopefully my sister-in-law (who happens to be much better at sewing than I am) won't judge me when she looks at it. I find comfort in the fact that it is for a four year old and she will probably never look at the seems or the sewing.

To make the tulle skirt I just measured out a piece of elastic, cut it, sewed the ends together and wrapped cut pieces of tulle onto it. I don't know what the technique I used is called, but I would bet it's pretty easy to find youtube videos of tulle skirt making on the internet.

Thursday, January 26, 2012

Finished Advent Calendar

Remember THIS crazy project I worked on FOREVER. Well I wanted to show you all how the finished product turned out. December flew by in a hurry. And I guess January has too, since it's almost February.

It actually seems like another lifetime that I worked on this advent calendar and finished it. I have to be honest that by the time I actually finished, I was really annoyed with everything about it. It took all of my will power just to get it done. But, it's done now and I can look at it, folded neatly in my storage closet with my Christmas decorations, and enjoy the results of my labors.


Here's a picture of the top. Everything was hand stitched on so it took a long time. It was definitely worth it in the end. It looks beautiful!


And here is the finished project hanging on the wall. I need to re-do the star next year and also hang it differently because it is all wrinkly at the bottom. But, I put it away for now and will tackle those tiny details next Christmas.

I am so excited to have this advent calendar for my family to enjoy for years to come. It was a lot of work so if you want to do one then I would seriously start RIGHT NOW. That way you can do a little at a time and not be so annoyed with it in the end.

Tuesday, January 24, 2012

Still Crafting...

Hi there! For anyone who actually looks at this blog, I am still here and I am still crafting. It is precisely because I have been so focused on creating that I have not had time to post my creations.

Just to prove I am still moving, here is one of my creations that I just finished...


I made this little ballerina doll for my niece who is turning four this week! I'm off to send it in the mail. I hope she loves it, because I do!

More pictures, with a link to the pattern, and my thoughts on it coming soon!

Thursday, December 8, 2011

The Last Half - Advent Calendar

Well I certainly got off track with my posting when I left town for Thanksgiving. I thought I would have all the time in the world to post while I was on vacation, but of course spending time with family always soaks up every minute and ounce of energy I have. So I will post the rest of the advent squares all together.

I have to admit that my advent calendar is still not finished. Yes I know that it is the 8th of December, but in my defense I have had many other things to take care of that are higher on my priority list than crafting - such as being a wife, mother, and homemaker. Normal everyday responsibilities sometimes add up for me, probably because I am not always good at using my time efficiently.

For a while I felt pretty bad about my failure to produce this beautiful advent calendar on December 1st, especially since everywhere you look on the internet people are accomplishing their crafting goals. In an effort to make this blog realistic I would like to say I am not always one of those people. I love to craft and most of the time I get things done by my "deadline," but sometimes it is okay to be a bit behind. After all this is definitely not life or death. And you know what, my son isn't even old enough to understand Christmas, let alone presents and advent calendars. Next year will really be the year that counts. So if I'm a bit behind schedule this year then I say it's okay!

Enough with the confessions. Here are the last 13 squares. I love how they all turned out.


All 25 pockets are now sewn to my tree backing. I just have to finish stitching the numbers - which is very fast to do so far - and then sew the layers together. I hope to have it all complete and hanging on the wall this weekend. I am pretty confident it will happen too, because I'm finally sick of seeing it sitting on my craft table.

Friday, November 18, 2011

Group #3 - Advent Calendar

Four more pockets stitched! These four sure turned out fun. My favorite of the bunch is definitely the Christmas lights. They are so cute!


Can you tell that the last one is a wise man? I think he needs a beard? Or something...he just feels like he is missing something. I can't really figure it out though so it may just stay the way it is. If you have any ideas on how to make him appear more "wise" then please let me know!

Now I have 12 down and 13 more to go! Almost halfway!

Wednesday, November 16, 2011

Group #2 - Advent Calendar

Here's the second batch of advent calendar pockets...


I have to admit that the milk and cookies is so far my least favorite one. The idea is so fun, but I think I just didn't quite execute it correctly. I think it would have turned out better if I had made the window cover the entire top portion of the square (maybe with 2 windows & 1 set of curtains?). I don't know. It might bug me enough to add some "wall paper" to the background. We'll see.

All of the other ones turned out great! I think the reindeer is adorable and I love the bell with music notes and the presents.

So far I am still going strong. I have been working constantly on this project, but I think that it will be slowing down soon for the Holiday travels. Hopefully I can still get it all done before December 1st!

Monday, November 14, 2011

Group #1 - Advent Calendar

My first 4 squares are ALL done! I am so, so, so excited about how they turned out. And seeing them done is getting me more and more excited to continue stitching my heart out.


I absolutely LOVE my little snowman! And the gingerbread house turned out so cute as well. The stocking is fun too! And you just can't go wrong with a beautiful snowflake right? It is so nice to begin seeing a finished product!

I have more pockets in the works and will be sharing more batches over the next week and a half or so. I must admit that each pocket takes a good 2-3 hours. Except for ones like the snowflake. That one only took about 45 minutes at most. The gingerbread house definitely took a good 3 hours. All of the little french knots just take time because you have to cut and re-knot and cut and re-knot quite a few times. It was all worth the time though.

And I must confess that I have been listening to Christmas music while working on this advent calendar. I am ashamed to admit it, but how can you work on something so festive and not enjoy some good tunes? Hopefully next year I will come to my senses and enjoy Thanksgiving fully before moving on to Christmas.

PS: If I find the time then I might come up with some Thanksgiving decorations for our home. However, I am guessing that next year will be the year for Thanksgiving decorations since we are headed out of town this weekend and won't really be able to enjoy any decorations that I make. We will see though. Happy Monday to you all!

Friday, November 11, 2011

Christmas Advent Calendar {My Life During November}

In honor of this fun date - 11/11/11 - I thought I would share my November project. It has pretty much taken over my entire life this month. I have been working on it every spare moment I can find. The initial idea for this project came from A Feathered Nest. She created a Christmas advent calendar two years ago that I LOVED. I didn't find it until last year at the end of November so I did not have the time to create my own version for Christmas. This year will be our first Christmas not visiting family so I thought it would be the perfect year to start a tradition of an advent calendar.


If you can believe it, I started this project way back in March. I gathered supplies and began cutting out the felt squares for the pockets (just the bases). Then a few months went by and I didn't do any work on it. In August I started cutting out some of the shapes for the images on each pocket. When I planned out my pockets I wanted to have a Christmas themed image on each one. Abby's version HERE had quite a few pockets that were darling, but they were just simple patterns/designs and I just didn't want to go that route. I wanted each square to be unique and I also wanted to bring in the religious aspect of Christmas more - since Christ is was Christmas is all about. I have been working just a little here and there ever since August on the cutting phase.


At the end of October I decided that I really wanted to finish it in time for Christmas this year. So I set out a schedule to finish it in one month. So far I am still on schedule to finish by November 30th. I hope I can make it!


Here are my squares at the first stage - just cut outs! This project will be entirely hand sewn. That is why it will be my life this month. I have been stitching, stiching, and stiching everyday for the past week and a half. I am so excited to see the finished project at the end of the month.


All 25 advent pockets. Remember, these are just the cutouts so they really don't look that great yet. The stitching is where the magic happens. Which is funny because I have NO experience with embroidery or hand stitching. Hopefully it all turns out good!


Snowman, Gingerbread House (I added this one), Bell (to symbolize music), Presents!


Stocking, Snowflake (my addition), Christmas Lights (inspired by the pictures of Abby's friend), and Mittens.


Milk and Cookies, Rudolph, Holly Leaves & Berries, Wiseman (all of these are Meagan originals except for the Holly Leaves).


Santa's Sleigh, Mary, and Christmas Tree (the sleigh and Mary are my additions).


Sheep, Gingerbread Man, and Angel.


Ornament, Birthday Cake (to celebrate Jesus' birth - I think this will help my son get more excited about celebrating Jesus' birthday), and Candy Canes.


Wreath, Cup of Hot Cocoa (another addition of mine), and Santa Clause.


And last, but not least, Baby Jesus in a Manger.


I am so excited to see these done with the stiching. Some of them are close so I will start sharing them next week. There's still time for you to make your own as well. So go gather your supplies and start sewing with me!

Friday, September 30, 2011

90 Minute Shirt

Here's the birthday shirt I made for Bennett's first birthday. I wanted to test out the 90 Minute Shirt tutorial from MADE and I thought his birthday would be the perfect opportunity. I purchased a men's t-shirt from goodwill and went to work on it. I wanted his birthday to have a theme, but since he is only 1 year old and we didn't want to have a big party with friends I ended up deciding to go with a simple theme of balloons. That's why I made the balloon wreath and hung balloons from the ceiling. I also thought it would be fun to add 3 balloons (hand stitched) to the front of his birthday shirt.


I thought the balloons turned out cute, but I am really not skilled with hand stitching. I think this was actually my first attempt, unless you count sewing on ribbons and elastic to pointe shoes (which is definitely not the same thing). The fabric ended up gathering a little but once it was on him you couldn't really tell. I think you can probably tell that the perfectionist in me has died. At least when it comes to anything handmade by me. I think I am still a huge perfectionist when it comes to dance.


This is the best picture I captured of him with his birthday shirt. The other good ones I have you can't see the front of his shirt. I was very proud of myself for making a shirt for him. I like the idea of making them for him in the future, but I probably will only do it for birthdays. Then it can be a special birthday tradition. So there you have it. My first handmade clothes item for my son. Now I mark that off as completed on my goal check list for the year.

Tuesday, August 30, 2011

Sewn Note Cards

I have so much to catch up on with this blog. I have been working on tons of projects and cooking up new recipes in the kitchen. It was a very busy summer with everything that took place in our home. Now I am hopefully ready to get some posts up and running.


This craft is from way back in June. I had the privilege of attending girls camp with the girls in my church (The Church of Jesus Christ of Latter-Day Saints). I am in charge of helping the girls get to camp but was also invited to help out while camping. It was a 6 day camp and was very fun, but very tiring. Up at the camp the girls have mailboxes where they can receive little notes/mail from their friends or family members or from fellow campers and leaders. Before camp we had our Relief Society write letters to each of the girls for each day. So the girls got 5 letters (since the 6th day was just clean-up) each. I used THIS tutorial for hand-sewn note cards. It was so much fun to have a simple, yet handmade, card to give the girls each day. I want to make a hundred more of these now that I know how.


I actually did make 100 of these and it probably took about 2 hours from start to finish. They are so easy, but beautiful. And the best part about them is that I used lots of paper scraps.


I think I will make them again for next years girls camp (with a different shape on the front).

Saturday, February 26, 2011

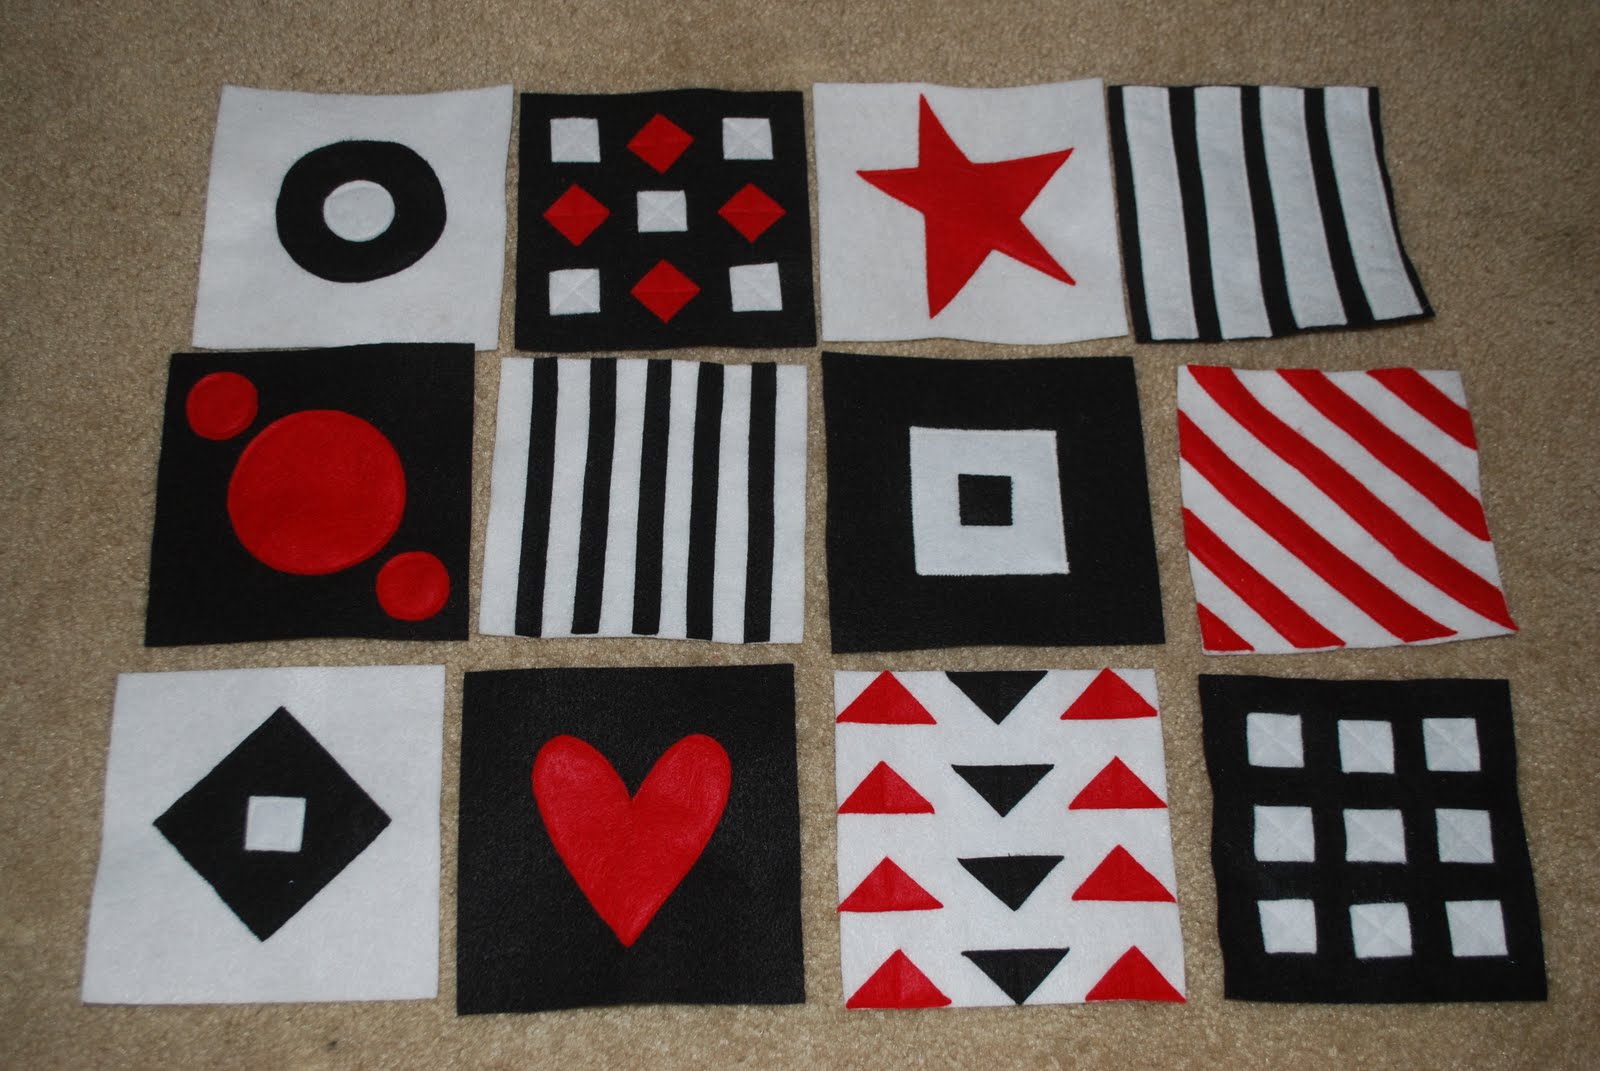
Felt Squares for Baby

This may be my absolute favorite baby gift I have ever made. It was so much fun and hopefully they will get a lot of play time in with the babe. Like I said in an earlier post I have a good 10 or so baby gifts to prepare for friends having babies (2 of which are having twins), so I was excited to find this project idea over at It's Good for the Heart! The original idea came from The Crafting Chicks. Here is my twist on the baby felt squares.


I made this set for a baby shower I went to this morning. They were so simple and easy and very inexpensive. But I love how they turned out. There are endless possibilities of shapes/designs so that makes this project even more appealing. I look forward to making up some more sets for other babies on the way!

PS: You can either sew each little shape onto the felt square or you can use a glue gun to attach them. I chose to sew them on because it seemed a little more finished and sturdy to me but I bet the glue gun would work wonders too.

Tuesday, December 28, 2010

Grocery Bag Holders

I think I am officially the queen of finding tutorials and following them. It appears as of late that I am not all that creative on my own. Maybe that should be my New Year's resolution.

Anyway, about 1 1/2 years ago I made a GROCERY BAG HOLDER for our kitchen so that we would have somewhere to store our plastic grocery bags. My mother saw it while visiting and mentioned that she would like one so I made her one for Christmas. Her kitchen colors are greens and yellows so I tried to follow her color scheme.


I love this project because it is so useful and it helps brighten up your kitchen or closet (depending on where you hang it). Once I finished my mother's bag I decided that I should also make one for my best friend Mary.


Her kitchen colors are light blue, navy, and brown. I found this fabric at JoAnn's and thought it would be perfect. After it was finished it became my favorite. I love the floral design and the colors are beautiful. I hope you enjoyed your gifts Mary and mom!

Sunday, December 26, 2010

Hooded Teddy Bear Towels

One of my Christmas gifts to my husband this year was a Teddy Bear Hooded Towel. He recently mentioned that he wanted a hooded towel like our son Bennett. He was wondering why adults don't get hooded towels as well. So, I made him one as a surprise. I decided to make a matching one for Bennett. Here's Bennett modeling his towel for us. I love the cute little ears! You can find the tutorial HERE.


A close up of those ears! This was one of the more simple projects I have done. From start to finish it took me about an hour to cut and sew two towels. What a fun gift this would be for all of those baby showers I have coming up!

Sunday, December 12, 2010

Airport Car Seat Bag

With all of the traveling we have been doing to show off little Bennett we have been struggling to keep his car seat clean and free from rips (no rips so far luckily). The plastic bags that they have at the airport cost at least $5 and they rip so easily that they really are not all that protective. My husband decided to do a quick search online to see if he could find something we could buy to protect the car seat and he found THIS tutorial on how to make your own airport car seat bag. Genius! Of course he knew I would want to make one. He literally found the tutorial on Thursday and I had it made by Saturday night. I bought the heaviest material I could find - it is a heavy canvas fabric that was actually pretty cheap and on sale. They mostly had light colors so I went with red thinking it would show less dirt than the creams. Plus our luggage is red so now our car seat fits right in! Here is how it turned out:


Can you tell how much I LOVE it? It is amazing, and so easy to carry! I think everyone needs this bag. Who wants one?

Friday, August 27, 2010

Nursing Cover

I am working my way back into crafting. And more especially I am working my way back into blogging about my crafting. Last year I made this nursing cover for a friend:


I used THIS tutorial! I finally decided I would make one for myself because the one I have is not very large and my little guy is getting bigger. I love how it turned out. I actually bought some other fabric and will be making one more! I love having options and things that match different outfits. Lets face it, a girl has got to match!

Saturday, May 8, 2010

Burp Cloths

I saw THIS adorable tutorial on how to beautify cloth diapers and turn them into burp cloths. I knew that I wanted to make them as gifts for family and friends, as well as make some for our own little one. These were my first attempt:


I made some for my sister-in-law who just had a darling little baby girl. And I also made a couple for one of my friends who also just had a baby girl! I absolutely love the fabric and am saving the rest to use if I ever have a little girl of my own!

Saturday, April 24, 2010

Rocking Chair (Completed)

I finally figured out what to do for a seat cushion on our rocking chair! I found a CUSHY seat pad at Cost Plus and made a slipcover for it! It was very simple to make and I think it turned out great. Now our rocking chair is PERFECT and COMFORTABLE for all of those readings, late night feedings, and rocking our little one to sleep.


Here you can see the glossy finish that my husband added!


A close up of the seat cushion!


Gearing up for story time!


And preparing for the late night feedings and rockings to sleep!

Thursday, April 22, 2010

Basket Liners

I have been doing finishing touches on our baby's nursery and one of the things I wanted to do was buy baskets for his toys and make cute basket liners to tie in nursery colors. I really love how they turned out and I love the fabric.


Now he has toys and books ready to go!


A close up of the liners!

I am also using this same fabric for my seat cushion on the rocking chair (coming up soon)! And we are thinking about using this fabric for the bassinet skirt and bumper pad! I can't wait to get it all finished and see the nursery complete!

I used THIS tutorial, for the liners, from "Make It and Love It." I found it last summer and made these...


for my snack baskets in the kitchen. Keep in mind that we live in an apartment so that is why we have our food storage out in the open for everyone to see. I at least tried to make it look as cute as I could. Of course how cute can you really make cans of food look?