Tuesday, June 28, 2011

Sausage & Egg Megmuffins

In our family we enjoy breakfast for dinner quite often (usually about once per week). Our old standbys are breakfast burritos, pancakes, or breakfast sandwiches. So here's what our sausage, egg mcmuffins look like Meagan style (hence the name Sausage & Egg Megmuffins, haha).


We cook up a sausage patty; my famous most delicious, secret recipe scrambled egg patty (really not that secret - just add a little milk and cheese); slice a thick piece of Tilamook cheddar cheese; and pile it all on a toasted, buttered, sourdough English muffin. That's what I call a good breakfast sandwich. You could also add sliced bell peppers and avocado to spice/health it up.

I usually pair these delicious sandwiches with a big bowl of cut up fruit. This is yet another quick and easy meal at our home. Hope you enjoy some breakfast for dinner soon.

Sunday, June 5, 2011

Creamy Macaroni & Cheese

All I can really say about this dish of macaroni is YUM, YUM, YUMMY!


Just ask my little guy! Forget the boxed mac 'n cheese. This stuff is way creamier, and made with all sorts of cheese! Parmesan, sharp cheddar, and cottage cheese. It is seriously AMAZING!


Mmmmmm! He can't get it in his mouth fast enough!


And the best part about it all - it's super easy to make. So gather your ingredients and get ready for a macaroni dish that will knock your kids socks off!

Favorite Mac' and Cheese
From my friend Hilary

1 (8 oz) pkg. elbow macaroni
1 (8 oz) pkg. shredded sharp Cheddar cheese
1 (12 oz) container small curd cottage cheese
1 (8 oz) container sour cream
1/4 cup grated Parmesan cheese
Salt & Pepper to taste
1 cup dry bread crumbs
1/4 cup butter, melted

Preheat oven to 350 degrees. Bring a large pot of lightly salted water to a boil; add pasta and cook until done. Drain. In 9x13 inch baking dish, stir together macaroni, shredded Cheddar cheese, cottage cheese, sour cream, Parmesan cheese, salt, and pepper. In a small bowl, mix together bread crumbs and melted butter. Sprinkle topping over macaroni mixture. Bake 30-35 minutes or until top is golden brown.

Wednesday, June 1, 2011

Cornbread

It has been a while since I have had a chance to post on this blog. I have so many projects, recipes, and crafts to post. Hopefully I can get caught up this month.

For starters I wanted to share my favorite cornbread recipe! It is quick, easy, and truly the best cornbread ever!

Once you try this cornbread you'll never be satisfied with any other recipe. It is so sweet and delicious that you could serve it as dessert with chili or any other meal you wish. I often make it without the brown sugar topping and top it with butter and honey instead (as pictured above). Either way is tasty!

1 cup flour
1 cup yellow corn meal
2/3 cup sugar
2/3 cup brown sugar
1 tsp salt
3 1/2 tsp baking powder
1 egg
1 cup milk
1/3 cup vegetable oil (or olive oil for a healthier spin)

1. Mix all ingredients together
2. Pour in greased 8'' x 8'' pan
3. Bake at 400 for 20-25 minutes
4. Remove from oven and mix 1/4 cup brown sugar and 2 tbsp melted butter to sprinkle on top

Note: This cornbread is so good that I usually make a double batch and bake it in a 9x13 inch glass baking dish.

Friday, April 29, 2011

Sweet Spinach & Fruit Salad

Another simple recipe for a delicious salad to pair with any meal! I probably make this salad at least once a week with our regular meals. It is scrumptious and I always love how colorful and healthy it is!


Sweet Spinach & Fruit Salad

Spinach
Sliced Strawberries
Red Grapes (cut in half)
Slivered Almonds
Dried Cranberries
Crumbled Feta Cheese

Combine all ingredients in the quantities you desire and toss with your favorite sweet dressing (we usually use poppy seed). You can also add ripe pears, bacon, blueberries, or mandarin oranges. The possibilities are endless.

If you live near a Trader Joe's then try their Pear & Gorgonzola Salad Dressing with these salad ingredients. You will never want to buy another salad dressing in your life.

Wednesday, April 27, 2011

Open Faced Hummus Pita Sandwiches

I am always looking for super simple, healthy meals. A few years ago one of my friends gave me this idea while we were camping. The funny thing was that I forgot all about it until we planned a camping trip a few weeks back. These are so flavorful and delicious. And the possibilities are endless with toppings and flavors.


Open Faced Hummus Pita Sandwiches

Whole Wheat Pita Bread (you can also use naan or any other flat bread)
Your Favorite Hummus (I use Trader Joe's Original)
Sliced Red Bell Peppers
Basil Leaves

Spread the hummus on your bread, top with bell peppers and broken pieces of basil leaves. You could really use any toppings you think would go well with hummus. Carrots, celery, broccoli, tomatoes, cucumbers, etc.

Give it a try! You won't be disappointed!

Monday, April 25, 2011

Easter 2011

This year Easter was kind of a pathetic attempt at a celebration for me.


These three jars were all the Easter decorating I had time for. And I didn't even get a wreath on my door - totally lame.

But I was pleased that the Easter bunny still managed to find our poorly decorated apartment. And he still left treats and gifts for us all.


Bennett had a fun first Easter playing with the eggs!


And he looked so handsome in his new Easter outfit!

We did enjoy a magnificent Easter feast (just for the 3 of us) with THESE most amazing au gratin potatoes. They were the most delicious potatoes I have ever eaten. I didn't get pictures though so check out Mel's Kitchen Cafe for pictures good enough to eat.

We also enjoyed a slower than usual Sunday morning with dad home to eat breakfast with us. We had IHOP pancakes (recipe to come soon), scrambled eggs, and fresh strawberries. That is the biggest breakfast I have made on a Sunday in probably over a year now. It was fun to eat all together.

I also whipped up some special Easter cupcakes for dessert, although by the time we ate dinner and candy from the Easter Bunny we had no room for our cupcakes. They were fun nonetheless.


Eggs in the Grass Easter Cupcakes

Cupcakes
Frosting
Shredded, Sweetened Coconut
Green Food Coloring
Jelly Beans

Put coconut in a bowl and put 4 drops of green food coloring in. Mix with a fork until coconut is a nice, grassy green. Frost cupcakes, dip in green coconut, and put jelly beans on top so they look as though they are Easter eggs hiding in the grass.

I had this idea from Our Best Bites' chick cupcakes. Then I saw Dana's Easter eggs in the grass cookies at MADE and I sort of just combined the ideas to create my own version.

Hope you all had a wonderful Easter!

Friday, April 22, 2011

Reusable Grocery Bag

I LOVE the idea of making your own reusable grocery bags and I NEED to make a few of them soon! I had hoped to get them done this week in honor of Earth Day today but I just have not found the time. Too many other more important projects to finish first!

I searched for a tutorial and decided I would follow this one at sew4home.


Isn't it gorgeous? Click on the picture for the detailed instructions.

I love the look and after reading through the instructions it seems extremely durable. Happy Earth Day to you all!

Monday, February 28, 2011

Blueberry Waffles

Lets face it. My husband is OBSESSED with blueberries. He loves anything and everything blueberry. So...I made him blueberry waffles. I randomly found this recipe somewhere online (if it is yours let me know so I can give you credit). I really like it a lot because of the addition of the cinnamon flavor.


Blueberry Waffles

2 eggs
2 cups all-purpose flour
1 3/4 cups milk
1/2 cup vegetable oil
2 tbsp white sugar
4 tsp baking powder
1/4 tsp salt
1 tsp vanilla extract
1/2 tsp cinnamon
1 cup blueberries

Preheat waffle iron. Beat eggs in large bowl with hand beater until fluffy. Mix in flour, milk, vegetable oil, sugar, baking powder, salt, vanilla, and cinnamon just until smooth. Let sit 10 minutes then fold in blueberries. Spray preheated waffle iron with non-stick cooking spray. Pour mix onto hot waffle iron. Cook until golden brown.

Top with butter, syrup, fresh blueberries (or strawberries), and powdered sugar.

Sunday, February 27, 2011

Blueberry Streusel Muffins

This AMAZING recipe comes from a friend from church. She is known in our ward as "The Baker." Well maybe not, but everyone LOVES her fresh baked goods. Her cinnamon rolls are scrumptious as well (I really need to make those).

Anyway, on to the blueberry muffins. My husband and son helped me make 3 batches (or 3 dozen) of these beauties for a baby shower yesterday!


Aren't they amazing? They turned out perfectly. And there are so many possibilities with the recipe! Check it out.

Blueberry Streusel Muffins

(adapted from Martha Stewart Living Annual Recipes 2003)

You can do different combinations as long as the total amount of the add-ins does not exceed 1 ¼ cups. Try peach and pecan, blueberry and lemon zest, peach and raspberry, raspberry and walnut, strawberry and orange zest or lemon zest and poppy seeds (add about ¾ cups nuts or 2 tablespoons zest or poppy seeds).

10 tablespoons (1 ¼ sticks) unsalted butter, melted, plus more for pan

1 ¾ cups all-purpose flour

1 tablespoon baking powder

1 teaspoon ground cinnamon

¼ teaspoon salt

1 ½ teaspoons vanilla

⅔ cup sugar

⅔ cup milk, room temperature

1 large egg, room temperature

1 ¼ cups fruit (blueberries or other combo)

1. Preheat oven to 400°F. Butter a standard muffin tin. Combine flour, baking powder, cinnamon, and salt in a large bowl; whisk to combine.

2. In a medium bowl, combine butter, vanilla, sugar milk, and egg; whisk to combine. Fold butter mixture and fruit into flour mixture; use no more than ten strokes.

3. Spoon ¼ cup batter into each prepared cup. Press 2 tablespoons streusel (see below) on top of each, if desired. Bake until tops are golden, 15-17 minutes. Remove from oven and let cool in pan 15-20 minutes; transfer to a wire rack.

Streusel Topping:

5 tablespoons unsalted butter, melted

⅔ cup all-purpose flour

⅔ cup confectioners’ sugar

¼ teaspoon ground cinnamon

Pinch of salt

Combine ingredients in a medium bowl and mix with fingers until mixture is moist and crumbly.

*Give these a try! You will not be disappointed.

Saturday, February 26, 2011

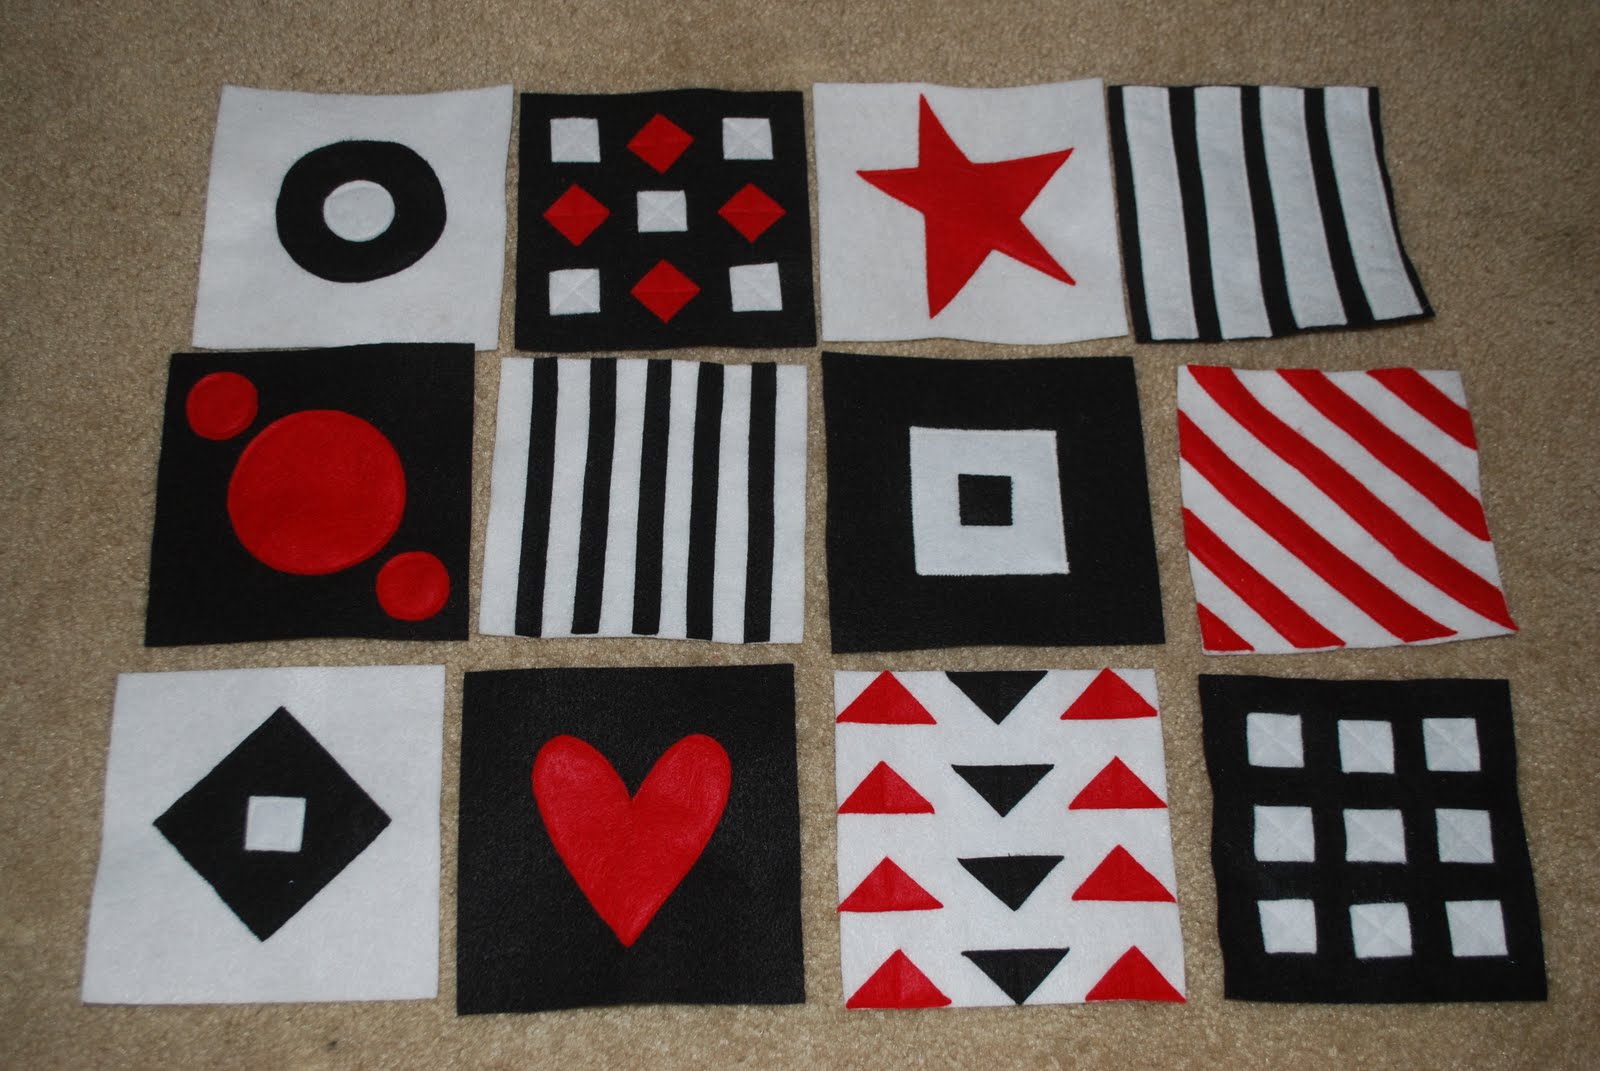
Felt Squares for Baby

This may be my absolute favorite baby gift I have ever made. It was so much fun and hopefully they will get a lot of play time in with the babe. Like I said in an earlier post I have a good 10 or so baby gifts to prepare for friends having babies (2 of which are having twins), so I was excited to find this project idea over at It's Good for the Heart! The original idea came from The Crafting Chicks. Here is my twist on the baby felt squares.


I made this set for a baby shower I went to this morning. They were so simple and easy and very inexpensive. But I love how they turned out. There are endless possibilities of shapes/designs so that makes this project even more appealing. I look forward to making up some more sets for other babies on the way!

PS: You can either sew each little shape onto the felt square or you can use a glue gun to attach them. I chose to sew them on because it seemed a little more finished and sturdy to me but I bet the glue gun would work wonders too.

Thursday, February 24, 2011

Baby Shower


I hosted a small baby shower last night for a friend. She is having her third baby but it is the first girl so she definitely needed pink and girly things!


The decorations were super simple. I put together some tissue pom poms to hang from our ceiling fan. And I used my gift (a diaper cake) as the centerpiece for the goodies (sorry the lighting is terrible).


I made chocolate covered strawberries, sugar cookies (previously posted HERE), and my absolute favorite peanut butter cookies with kisses on top.


I did the diaper cake a bit different than I have done in the past. I made 12 cloth diaper burp clothes (previously posted HERE) and used those as the bottom and top layers to add color. I also LOVE the crepe paper roses that I saw HERE and added them around the cake for added cuteness. I think next time around I'll add a tiny little tissue pom pom on top as a cake topper.


Close up of the tissue pom poms.


And the recipe for the cookies:

Peanut Butter Cookies

1 cup butter – softened 1 cup granulated sugar

1 cup brown sugar 1 cup creamy peanut butter

2 eggs 1 tsp vanilla

2 ¾ cups flour ½ tsp salt

2 tsp baking soda 1 – 12 oz package peanut butter chips

(or chocolate kisses to put on top)

Thoroughly cream butter, sugars, eggs and vanilla. Stir in peanut butter. Add flour till well blended then add chips. Scoop onto cookie sheet and bake at 350 degrees for 12 minutes.

*If using Hershey's Kisses then skip the "add chips" step and scoop onto cookie sheet. As soon as you pull them out of the oven press 1 Hershey's Kiss into the center of each peanut butter cookie. They will be soft at first but will harden slightly as they cool.

**These are the BEST, MOISTEST peanut butter cookies ever. They do not dry up and crumble after the first day. And I love them!


Monday, February 21, 2011

Advertising

I had my first experience with advertisement this past weekend. I am the new Young Women's camp specialist in my ward and my first to do is to organize a ward dinner/fundraiser for Girl's Camp. I have never been in charge of a ward activity so it is a bit overwhelming for me. Lets just say I am taking it one step at a time.

We are hosting a spaghetti dinner and during the dinner we will hold a dessert auction with desserts that the Young Women will make. This is an annual fundraiser and people in the ward are very generous with their money so they usually raise enough money for all of the girls and adults to go to camp free of charge.

Here are the posters I came up with after my wonderful mother came up with the initial idea/title.


It was rather ironic because the power went out right while I was putting them together. I got out our flashlight and used this head lamp to continue my work. It felt appropriate since I was working on a project for camping.


I did end up adding a few meatballs to the spaghetti bowl and also another little white circle in the bottom left corner to let people know they should bring cash for the auction. Now that the advertising is finished we are on to the next step: decorations and dinner set-up! More to come on this particular event in a couple of weeks.

Saturday, February 19, 2011

My First Chocolate Cake

I saw this chocolate cake over at The Sisters Cafe and decided I would attempt to make my first ever chocolate cake. I have never really enjoyed chocolate cake - I am more of a white cake girl - but I have to admit that this cake was oh so good. It was moist and chocolaty (is that a word?) in all of the right ways. I skipped the make your own frosting step and used a can of store bought, but it turned out delicious anyway.


The sunset was particularly lovely the evening I made this cake. Aren't those colors beautiful?

Super Moist Chocolate Bundt Cake

1 Devils Food cake mix
1 4 oz. serving instant chocolate pudding mix
4 large eggs
1 cup sour cream
1/2 cup warm water
1/2 cup vegetable oil (I always use olive oil)
1 1/2 cups chocolate chips (I always use Milk Chocolate)

Place all ingredients, except chocolate chips, in a large mixing bowl. Blend with electric mixer for 1 minute. Stir down sides. Continue to mix on medium speed for 2-3 minutes. Stir in chocolate chips. Pour batter into prepared bundt pan. Bake 45-50 minutes at 350. Cool 20 minutes. Invert onto serving platter and spread with chocolate frosting.

For the homemade version of chocolate frosting go HERE.

Wednesday, February 16, 2011

Random Nothingness

This post has nothing to do with crafting, but I was really excited about some new findings and I thought I would share them in case anyone was interested.

I have been coupon shopping for almost a year now and it has been going well. I was scoring some seriously AWESOME deals and getting FREE diapers most of the time. I think cutting coupons and pairing them with sales at the stores is worth it just for the diapers (unless you are using cloth diapers). However, the food is not usually very healthy that you find for a great bargain. Most of it really is "junk" food. As I have been researching nutrition over the past month or two I have come to the conclusion that I would like to stay within a reasonable budget, but also eat mostly organic, natural food. Thus I was feeling stuck in a rut because most of the time "organic" is not cheap. And sometimes "organic" is not any healthier because it is not truly organic.

Anyway, I stumbled across this great coupon website, Organic Deals, and between that and shopping at Trader Joe's, Sprouts Farmers Markets, and sometimes Whole Foods I think I will be able to stay within our budget and still eat much healthier. Hooray!

How did I get into all this stuff? By making my own baby food for this cute little guy...

I love to cook so it just seemed natural to me (and fun) to make baby food for Bennett. I started this while we were in Brazil and made peas, carrots, and potatoes.

Once we returned from our trip I got to work on making many more varieties of baby purees and bought a few books about homemade baby food. It is really easy and very fun. Once I started making all of his food I began wondering all about nutrition and how to make the right combinations of foods so that Bennett was getting ALL of the nutrients he needed daily. I still have a lot to learn but it has made me want to eat a lot healthier for our whole family. Plus I learned that you should try to abstain from giving kids chocolate until they are 3 years old. Who knew? And I think that is really a personal choice for each parent to make. I am undecided if we will wait until he is 3 or not.

I told you this post was really random. These are just things that are on my brain while I am procrastinating crafting (or rather my research is taking up my extra time, and making Bennett's food takes some of my time too). Hope you all have a great day!


Tuesday, February 15, 2011

Most Delicious Enchiladas

Mel's Kitchen Cafe is one of my favorite food websites. Every recipe over there that I have ever tried is AMAZING. These delicious enchiladas fit into that AMAZING category. We had them last night for our super late, Valentine's Day feast. And I ate them again today for lunch, YUM!


I could not believe how delicious they were. And I had a hard time getting myself to stop popping bites into my mouth (even after I was super full). I used a Mexican blend of cheeses that I had on hand instead of the Monterey Jack cheese, but I think they turned out great anyway. One thing I would change next time is the amount of onion. I don't mind onions unless I can REALLY taste them. There was more of an onion flavor than I care for so in the recipe below I am changing the amount from the original. Check out the original recipe (with better photos) HERE.

Creamy Green Chile Chicken Enchiladas

Filling:
3 cups cooked, chopped chicken
2 (4 oz.) cans of green chiles, lightly drained
1 package (8 oz.) cream cheese, cubed and softened
1 can white or black beans, rinsed and drained (you can really use any type of bean you prefer here)

Sauce:
2 tablespoons butter
1/4 cup chopped onion (about 1/4 medium onion)
2 tablespoons flour
1/3 cup chicken broth
¼ cup milk
¼ teaspoon salt
¼ teaspoon pepper
1 can (7 ounce) green chile enchilada sauce
½ cup sour cream

8 ounces (about 2 cups) Monterey jack cheese, shredded
8 medium (soft taco size) flour tortillas
Handful of chopped fresh cilantro

Preheat oven to 375 degrees.

In a medium bowl, combine the softened cream cheese and green chiles. Mix well. Add the chicken and black beans. Mix to combine. Set aside.

In a large nonstick skillet, melt the butter over medium heat. Add the onion and cook, stirring occasionally, until the onion softens and starts to turn translucent, about 3-4 minutes. Sprinkle the flour over the onions and stir well. Cook for 1 minute, stirring. Slowly whisk in the chicken broth and milk. As you whisk and the mixture cooks, the flour will get less lumpy around the onions and the mixture will become smooth. Cook over medium heat until the mixture is bubbling and has thickened, about 4-5 minutes. Remove the skillet from the heat and stir in the enchilada sauce and sour cream.

Lightly grease a 9X13-inch baking dish. Spread about 1/4 cup of the sauce on the bottom of the dish. Fill each tortilla with about ½ cup of the chicken/cream cheese filling. Top with a small handful of shredded cheese, a couple tablespoonfuls for each enchilada. Save at least 1/2 cup cheese for the top of the enchiladas. Roll the tortillas up and place seam side down in the prepared baking dish. Continue filling enchiladas until the dish is full (I can easily fit 8 enchiladas in one pan).

Pour the white sauce over the top of the enchiladas. Top with remaining cheese. Bake for 20-30 minutes until the enchiladas are bubbling, hot and lightly browned. Sprinkle fresh cilantro over the top and serve.

Monday, February 14, 2011

Happy V-Day!

Happy Valentine's Day blog world. It has been busy around here since the start of the year but I have a few yummy recipes to post about soon. And I have a million friends having babies in the months to come so I am cooking up all sorts of crafty ideas for baby showers and gifts. Plus at some point I will actually get some of my sewing projects on my to do list done and posted. Here's what we enjoyed doing for Valentine's Day.


I made heart shaped pancakes from scratch. The recipe was quick, easy, and delicious. Then I warmed up some frozen strawberries over the stove and blended them up to make a yummy, quick strawberry sauce (it's just not Valentine's Day without something strawberry).


Then I also used my heart shape pancake molds to make heart shaped scrambled eggs. Cheesy, I know. But fun and yummy. I figured this was my year to play around because my son is not old enough yet to eat these things, let alone care about them. Next year I want to do THIS surprise breakfast, from Our Best Bites (I hope my husband doesn't read this), if I can manage to ever wake up before my husband. It looks so fun!

The rest of our day was pretty normal, except dinner went in the oven around 6:00 PM (talk about LATE), then just before it was coming out my husband was called to help give a blessing to a boy who is sick (learn about blessings HERE if you don't know what I am talking about). Thus it is almost 8:00 PM and we are just about to sit down to a fantastic dinner. Pictures and recipe to come tomorrow! Happy Valentine's Day everyone.

Tuesday, December 28, 2010

Grocery Bag Holders

I think I am officially the queen of finding tutorials and following them. It appears as of late that I am not all that creative on my own. Maybe that should be my New Year's resolution.

Anyway, about 1 1/2 years ago I made a GROCERY BAG HOLDER for our kitchen so that we would have somewhere to store our plastic grocery bags. My mother saw it while visiting and mentioned that she would like one so I made her one for Christmas. Her kitchen colors are greens and yellows so I tried to follow her color scheme.


I love this project because it is so useful and it helps brighten up your kitchen or closet (depending on where you hang it). Once I finished my mother's bag I decided that I should also make one for my best friend Mary.


Her kitchen colors are light blue, navy, and brown. I found this fabric at JoAnn's and thought it would be perfect. After it was finished it became my favorite. I love the floral design and the colors are beautiful. I hope you enjoyed your gifts Mary and mom!

Sunday, December 26, 2010

Hooded Teddy Bear Towels

One of my Christmas gifts to my husband this year was a Teddy Bear Hooded Towel. He recently mentioned that he wanted a hooded towel like our son Bennett. He was wondering why adults don't get hooded towels as well. So, I made him one as a surprise. I decided to make a matching one for Bennett. Here's Bennett modeling his towel for us. I love the cute little ears! You can find the tutorial HERE.


A close up of those ears! This was one of the more simple projects I have done. From start to finish it took me about an hour to cut and sew two towels. What a fun gift this would be for all of those baby showers I have coming up!

Saturday, December 25, 2010

Merry Christmas

For 2010 I made a goal for myself to design our own Christmas Cards. I did this for a couple of different reasons. I first thought it would be fun, then I realized it would be cheaper and therefore a bonus, and lastly I wanted to learn how to manipulate pictures/text in GIMP (a free online program comparable to Photoshop). I absolutely LOVE how they turned out! Here is the final product:

The names are a bit off centered due to the printing at Costco. I off centered them so that once they were cut they would be centered (that was a tricky business). Anyway, Merry Christmas to you all! I have posts about all of the crafty Christmas presents I did this year ready and coming your way this week! Hope you enjoy and are inspired to create something.

Sunday, December 12, 2010

Airport Car Seat Bag

With all of the traveling we have been doing to show off little Bennett we have been struggling to keep his car seat clean and free from rips (no rips so far luckily). The plastic bags that they have at the airport cost at least $5 and they rip so easily that they really are not all that protective. My husband decided to do a quick search online to see if he could find something we could buy to protect the car seat and he found THIS tutorial on how to make your own airport car seat bag. Genius! Of course he knew I would want to make one. He literally found the tutorial on Thursday and I had it made by Saturday night. I bought the heaviest material I could find - it is a heavy canvas fabric that was actually pretty cheap and on sale. They mostly had light colors so I went with red thinking it would show less dirt than the creams. Plus our luggage is red so now our car seat fits right in! Here is how it turned out:


Can you tell how much I LOVE it? It is amazing, and so easy to carry! I think everyone needs this bag. Who wants one?